How to Use a Pour-On Applicator for Effective Application?
In the realm of livestock management, effective application tools are essential. The Pour-On Applicator stands out for its ease and efficiency. According to Dr. Jane Thompson, a leading expert in veterinary practices, “Using a Pour-On Applicator can transform how we deliver treatment.” Her insights highlight the importance of precision in application methods.
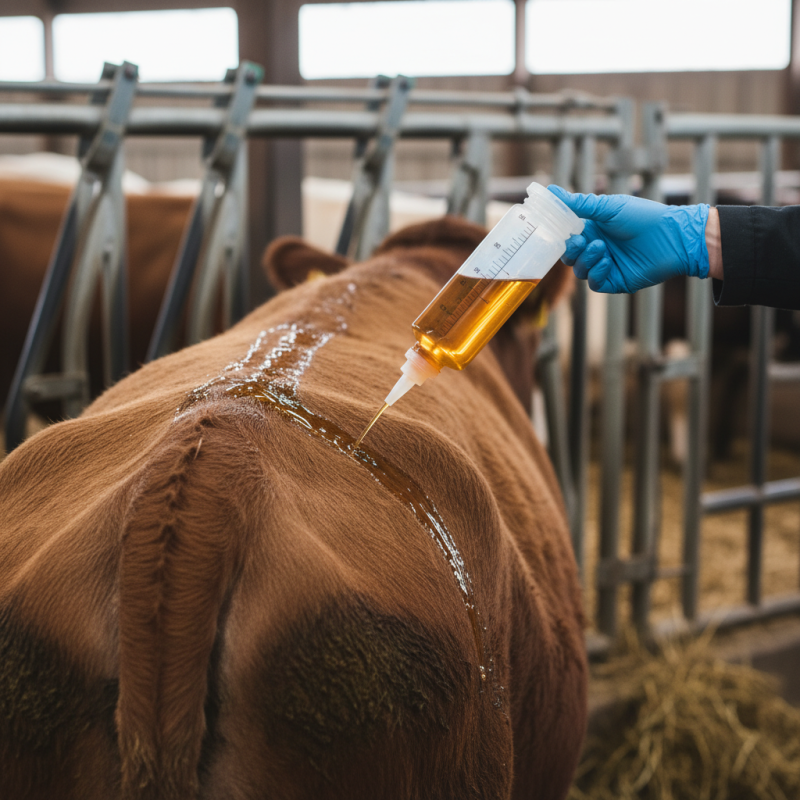
When utilizing a Pour-On Applicator, understanding its design is key. This tool allows for even distribution of medications or treatments across the animal's hide. However, many users overlook the importance of technique. Ensuring proper positioning can greatly enhance the effectiveness of the application. Simple mistakes could lead to uneven treatment, causing doubts about the process.
Moreover, while the Pour-On Applicator simplifies the application, attention to detail is still crucial. Users must regularly clean the applicator to avoid contamination. Without regular maintenance, the tool’s effectiveness could diminish. It’s a reminder that even straightforward tools require diligence and reflection on best practices. With the right focus, the Pour-On Applicator can lead to healthier livestock and a better outcome for animal care.
Understanding the Basics of Pour-On Applicators
Pour-on applicators are essential tools in agriculture and veterinary practices. They deliver liquid solutions directly onto the skin of animals, providing ease and efficiency. Understanding their basics can significantly enhance their effectiveness. These devices work through gravity, allowing the solution to flow smoothly from the container to the target area.
When using a pour-on applicator, it is crucial to hold it at the correct angle. This ensures that the liquid is evenly distributed. Aiming for a narrow strip along the animal's back is often effective. However, care must be taken to avoid over-application, which can lead to waste or skin irritation. Users must also be aware of the liquid's properties; not all solutions behave the same way.
Practicing with the applicator is important. A smoother application may result from familiarizing oneself with the device's mechanics. Yet, it's easy to make mistakes, especially under pressure. Observing the animal's response after application can provide valuable feedback. Adjusting the technique based on these observations can lead to improved results over time.
Effectiveness of Pour-On Applicators in Different Applications
Choosing the Right Pour-On Product for Your Needs
Choosing the right pour-on product is essential for effective application. Different formulations are designed for various needs. For animal health, consider the specific issues you face. Is it for parasite control or nutrition? Knowing your goals helps narrow down options.
When selecting a product, read labels carefully. Ingredients matter. Some products are safer for young animals. Others may not be suitable for pregnant females. Don't hesitate to consult a vet for expert advice. Their experience can guide you through the options available.
Tips: Always test a small amount first. This limits any adverse reactions. Monitor your animals after application. Look for signs of distress or unexpected behavior. Adjust your choice if necessary. Remember, the right product makes all the difference, but no application is perfect. Reflection and observation are key to finding what suits your needs best.
Step-by-Step Guide to Filling the Applicator Properly
Filling a pour-on applicator properly is crucial for effective application. Start by ensuring that the applicator is clean. Any residue from previous uses can affect the accuracy. After cleaning, gather the product you need to apply. Use a funnel for precision. It minimizes spills, reducing waste.
Next, fill the applicator with the product slowly. Pouring too quickly can lead to overflow. You should also check for air bubbles during this process. Air bubbles can create inconsistent application. Once filled, securely close the applicator cap. Inspect it for any leaks before use.
Finally, some people may rush this process. Patience is essential. A well-filled applicator means a more effective treatment later on. It’s better to take an extra minute to ensure accuracy than to deal with the consequences later. Always reflect on your technique for improvement.
How to Use a Pour-On Applicator for Effective Application? - Step-by-Step Guide to Filling the Applicator Properly
| Step | Action | Tips |
|---|---|---|
| 1 | Gather Supplies | Ensure you have the applicator, product, and safety gear ready. |
| 2 | Read Instructions | Familiarize yourself with the product guidelines. |
| 3 | Prepare Applicator | Clean the applicator to avoid contamination. |
| 4 | Fill Applicator | Pour the product slowly to avoid spills and overfilling. |
| 5 | Secure the Cap | Ensure the cap is tightly closed to prevent leaks. |
| 6 | Apply Product | Point applicator towards the target area and dispense product evenly. |
| 7 | Clean Up | Wipe the applicator and store it properly after use. |
Techniques for Even Application Across the Target Area
Using a pour-on applicator can be straightforward, but achieving even application is crucial. Begin by selecting an appropriate target area. Ensure the surface is clean and dry to maximize absorption. This step can significantly enhance effectiveness. Practice holding the applicator at a consistent distance. This distance should be neither too close nor too far for optimal distribution.
When applying, move fluidly across the surface. Pause occasionally. Check for dripping or pooling. Avoid over-saturation in one spot, which can lead to inefficient use of the product. Instead, aim for a back-and-forth pattern. This technique can help distribute the substance more evenly. If you notice areas missed during the initial application, they may need a second pass.
Remember, the goal is to avoid heavy buildup in certain areas while ensuring coverage. Sometimes, imperfections are present, and adjustments are necessary. Regular assessments during the process can reveal areas that might require more attention. This reflective practice can improve future applications and lead to better results over time.
Maintaining and Cleaning Your Pour-On Applicator for Longevity
Cleaning and maintaining your pour-on applicator is crucial for its longevity. Regular care ensures accurate application and prevents contamination. According to industry studies, improper maintenance can lead to a 15% drop in efficacy. Simple cleaning steps can significantly extend the life of your applicator, making your investment worthwhile.
After each use, rinse the applicator with water. Make sure to remove any residue. If you're dealing with oil-based solutions, use a solvent recommended for the type of applicator. Allow it to dry thoroughly before storing. This prevents corrosion and buildup, which are common issues observed in poorly maintained tools.
**Tip:** Store your applicator in a cool, dry place. Avoid direct sunlight, which can damage the material. Reseal any containers after use to minimize exposure. Checking seals and components regularly can help identify potential issues early. Small repairs today can save costly replacements tomorrow. Maintaining your applicator is not just necessary; it’s a reflection of your commitment to effective application practices.